Starting a New Project in REAPER 7
Based on this video
Step 1: Check Audio Device Settings
Before starting a new project, make sure your audio device settings are correct. To do this, go to REAPER’s Preferences (ctrl + P, or cmd + , on Mac) and navigate to Audio -> Device -> Audio Device Settings. Ensure the correct audio device is selected, especially if you’re using external audio interfaces or microphones, as this can change when new devices are connected.
Step 2: Start a New Project
To start a new project, select File -> New Project, or click the first button on the toolbar. Initially, nothing may seem to happen because you haven’t saved the project yet. To avoid this, you can set REAPER to prompt you to save every time you start a new project.
To enable this, go to Preferences -> Project -> Prompt to save on new project. When prompted, save your project in a dedicated folder. Be sure to check the boxes that say “Create subdirectory for project” and “Copy all media into project directory.”
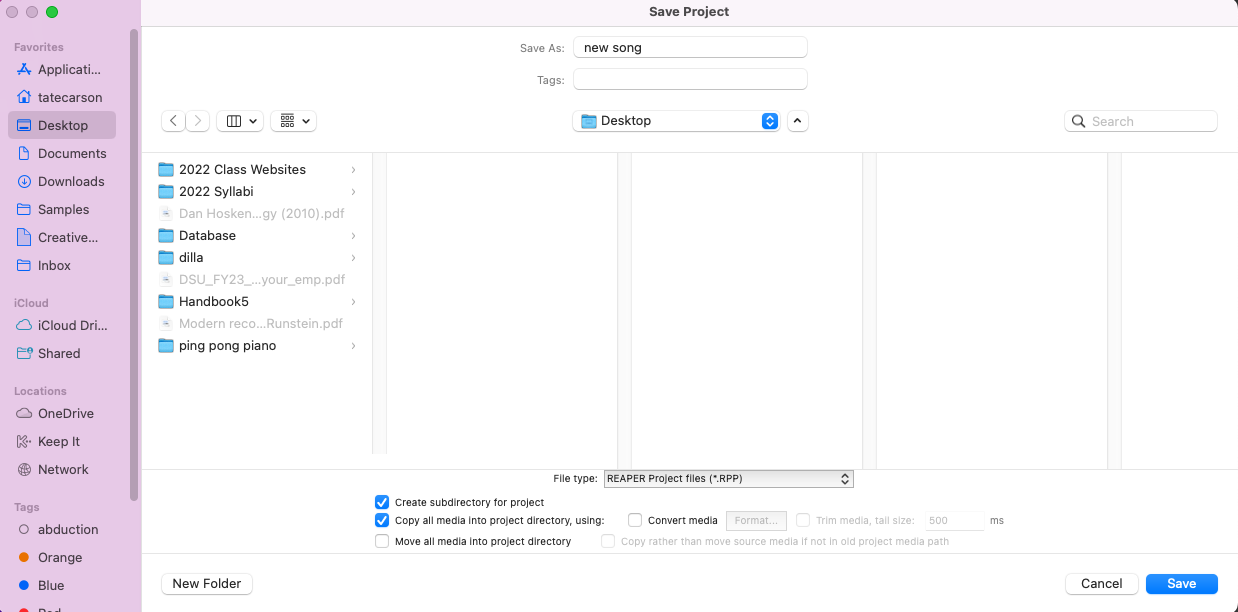
After saving, you’ll see a folder containing your project’s .RPP file, which is the main project file for REAPER.
Step 3: Configure Project Settings
To stay organized, create a folder within your project directory called “Audio” for your media files. Then, in REAPER’s Project Settings, make sure the option to “Copy media to project path” upon importing files is enabled. This ensures that any audio or media you bring into your project is copied into your project directory automatically.
Once your project settings are configured, you can save these as your default settings by selecting “Save as default project settings,” so you won’t need to repeat this process for every new project.
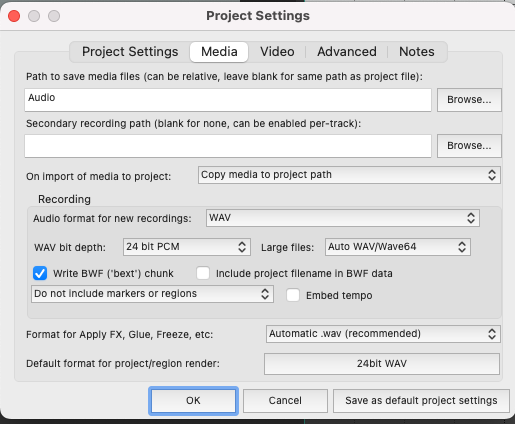
Step 4: Organize with a Peaks Subfolder
To further organize your project files, especially when working with larger projects, you can direct REAPER to place peak files (waveform cache files) into a separate subfolder.
Go to Preferences -> Media and check the box for “Put new peak files in peaks/ subfolder relative to media.”
This step helps keep your project folder tidy, especially if you’re working with many audio files, ensuring that peaks are neatly stored in their own folder.
Step 5: Exporting (Rendering) Your Finished Work
When a project is done, you export it as a single audio file. In Reaper this is called rendering: File -> Render (ctrl + alt + R). The settings that matter:
- Source: Master mix. Bounds: Entire project (or a time selection if you only want part).
- Sample rate: match your project (44.1 kHz for music, 48 kHz for video work).
- Format: which file type to write:
What Happens When You Upload
Before you release a track online, know what the platform will do to it. Streaming services measure the loudness of everything uploaded and turn tracks down to a common level, so listeners don’t reach for the volume knob between songs.
There is no prize for a loud track. A master crushed with a limiter gets turned down to the same level as every other track, and the distortion the limiter added stays in. Export clean, leave the peaks some room, and let the platform do the leveling. Mastering toward these numbers is a DAD 322 topic; for now, don’t fight the normalizer.
- More detail: iZotope: how streaming normalization works