Vital Leads & Keys Workshop
What you’ll learn
- Shape a lead that sustains and a polyphonic pluck that fades while you hold a note.
- Use glide for connected lead lines and velocity for changes in brightness.
- Save a useful patch for Project 5: Vital Synth .
We’ll build the lead together, then duplicate its REAPER track and turn the duplicate into a pluck so both sounds stay available. The settings are starting points. Listen and adjust rather than trying to match every number.
Start with one oscillator
Open Vital on an instrument track in REAPER. Initialize the preset from Vital’s preset menu. Save your work before initializing if you already have a patch open.
- On the
Voicepage, use a saw wave inOSC 1. The initialized oscillator is a suitable starting point. Keep unison at one voice and the other sound sources off. - Enable
Filter 1and itsOSC1input. Check that OSC 1’s output routes to Filter 1 so the sound passes through it. - Choose
Analog: 12dB, withBlendat the low-pass end. Start with low resonance and cutoff around 2 kHz. - Leave effects off while building the sound. Keep the output at a comfortable level, with no clipping on REAPER’s meters.
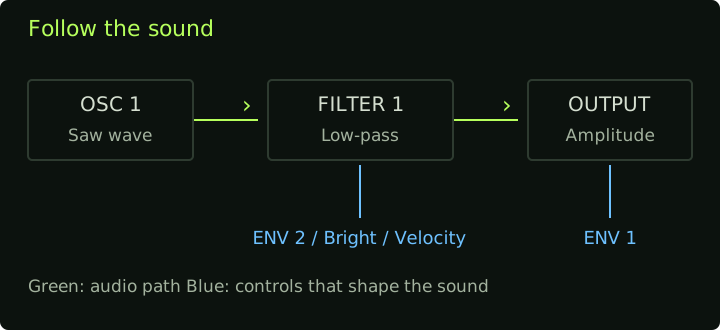
The blue connections are modulation, not additional audio sources. Env 1 is already connected to amplitude; we add the cutoff connections as we build.
Build a lead together
Give the note a sustained shape
Env 1 controls Vital’s overall amplitude automatically. Set delay and hold to
zero, attack around 5 ms, decay around 200 ms, sustain around 70%, and release
around 100 ms.
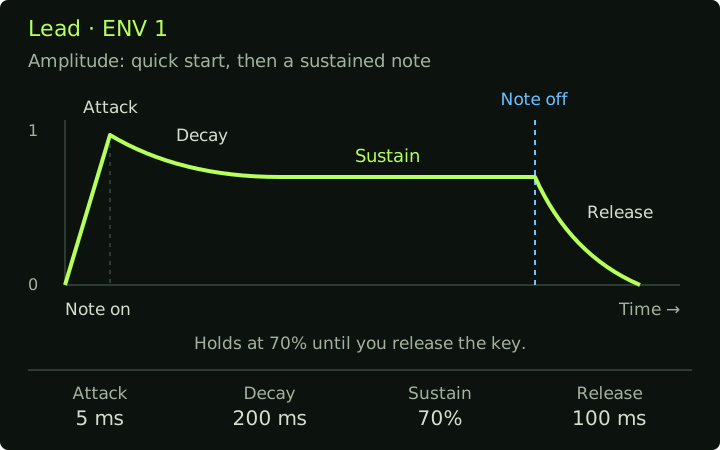
Envelope drawings are schematic, not to scale. Delay and hold are zero. Sustain is a level; its duration depends on how long you hold the key.
Hold a note, then release it. It should start quickly, remain audible while held, and stop without an abrupt click. Move cutoff by hand and choose a tone that suits a melody.
Connect the notes
In the voice controls near the bottom of Vital:
- Set
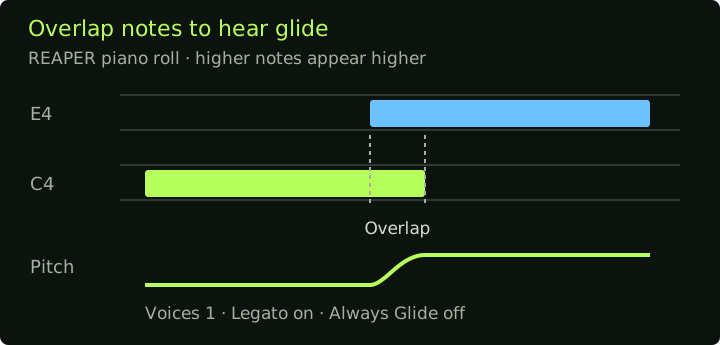
Voicesto 1 for a monophonic lead. This is separate from oscillator unison, which stacks copies of the oscillator within each note. - Set
Glidearound 0.08 seconds and enableLegato. LeaveAlways Glideoff so the slide is tied to overlapping notes. - Play separated notes, then hold one note while playing the next. Listen for the pitch slide and the connected envelope. In REAPER’s piano roll, overlap the MIDI notes to test this without a controller.
Add a brightness control
Drag Macro 1’s modulation handle onto Filter 1 cutoff. Set a positive amount
so turning the macro opens the filter from the darker starting sound to a
brighter lead. Rename the macro Bright.
Test the full macro range while playing the same phrase. Reduce the modulation amount if the upper end becomes harsh. You can turn the on-screen macro while REAPER plays a MIDI loop; a hardware controller is optional.
Save the preset as YourName_Lead and name its REAPER track Lead.
Duplicate the track and build a pluck
In REAPER, right-click the Lead track panel and choose Duplicate tracks.
Rename the duplicate Pluck. It has its own copy of Vital with the lead settings.
Keep the original Lead track unchanged so you can use both sounds in your piece.
Open Vital on the Pluck track and make the changes below there. Solo that track
while editing so you hear only the pluck. Keep the same oscillator and filter;
change the playing behavior and envelopes:
- Set
Voicesto 8, turnLegatooff, and turnGlidedown to its minimum. Play a chord to confirm that notes sound together. - Return
Brightto zero. InEnv 1, keep delay and hold at zero. Set attack around 5 ms, decay around 400 ms, sustain to zero, and release around 100 ms. Hold a chord: the sound should fade even before you release the keys. - Set the filter’s base cutoff around 800 Hz. In
Env 2, set delay and hold to zero, attack around 5 ms, decay around 250 ms, sustain to zero, and release around 100 ms. - Drag
Env 2onto Filter 1 cutoff. Add positive modulation until each note starts bright and quickly darkens. Adjust the amount by ear; there is no fixed percentage that works for every starting cutoff. - Drag the
Velocitymodulation source onto the same cutoff. Use a modest positive amount. Play soft and hard notes, or set alternating low and high velocities in a repeated REAPER MIDI phrase. Harder notes should sound brighter. Reduce the amount if every note becomes too bright.
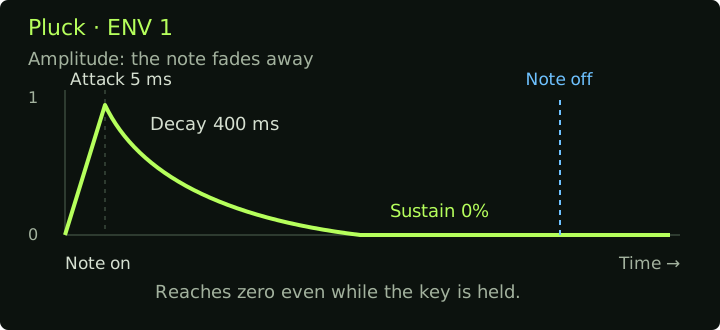
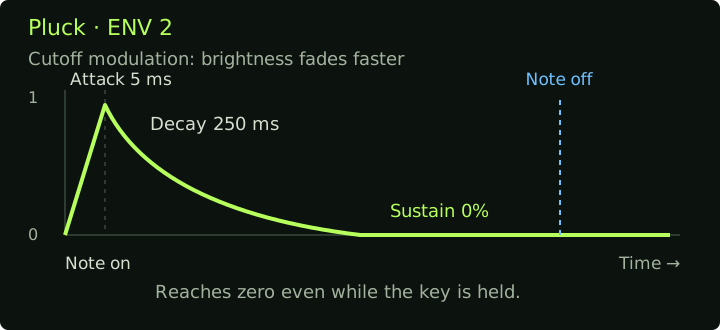
Note off is shown after each pluck envelope has reached zero. If you release earlier, the 100 ms release takes it from its current value toward zero. For Env 2, zero means no added cutoff modulation: the filter returns to its base cutoff, not to 0 Hz.
Env 1 shapes how long we hear the note. Env 2 shapes how its brightness
changes. Compare their decay controls one at a time to hear the difference.
Save this version as YourName_Pluck, keeping the lead preset too. Save your
REAPER project.
Play and share
Try a short melody with the lead and a chord pattern with the pluck. Choose one adjustment that helps the sound fit your Project 5 piece.
A few volunteers will play a patch from today or a previous class. Show one control or modulation connection and explain what we should listen for.
Before we finish, write down a possible final-project idea, the sounds or tools you might use, and one question to discuss with me. See the final project for the proposal requirements.
Keep today’s saved patches as material for Project 5. There is no separate workshop submission.
If you finish early
Add vibrato to the lead: choose a smooth triangle or sine shape in LFO 1,
switch its rate to seconds and set about 0.17 seconds per cycle, then drag
it onto OSC 1’s Tune control. Use bipolar modulation with a small depth of
about 5–10 cents either side of the note. Listen for a gentle pitch wobble.
Save a separate variation so you can compare it with the original.