Driving FMOD Parameters from Unity: Teleport Sound Example
Introduction⌗
In this tutorial, you’ll build a reactive teleportation sound system by controlling FMOD parameters from Unity using C#. You’ll learn to:
- Create and automate parameters in FMOD
- Instantiate and attach FMOD events in Unity
- Dynamically set parameter values via C# scripts
- Trigger sound transitions via Unity collision events
FMOD Parameters are made up of a range of values that can be adjusted in real-time inside our game. This allows us to create dynamic audio that responds to gameplay events, such as a player entering a teleporter.
FMOD Setup⌗
Before diving into code, we’ll first build the teleporter event in FMOD. This event demonstrates how to use both built-in and user parameters to control sound behavior dynamically.
Goal⌗
We’re designing an event that:
- Loops a magical hum sound for a teleporter object.
- Uses the built-in Distance parameter to fade out low frequencies as the listener moves away.
- Uses a custom Trigger parameter to fire a secondary teleport sound when the player enters the teleporter.
When done, your FMOD setup will let Unity control when the teleport sound plays—while FMOD automatically handles distance-based EQ changes.
1. Create the Event⌗
- Open FMOD Studio.
- In the Assets Browser, find Teleporter Loop Stereo 01 under
Audio Bin → Interactables → Teleporters. - Create a new event named Teleporter in the
SFX/Interactablesfolder. - Drag Teleporter Loop Stereo 01 onto Track 1 at the beginning of the timeline.
2. Loop Region and Asynchronous Playback⌗
- Create a loop region around the first second of the timeline. This keeps the playhead cycling near the start while the loop plays.
- Select your sound instrument and:
- Enable Async playback. This ensures the sound plays to completion even if the playhead remains in the loop region.
- Enable Loop While Playing.
- Enable Cut (cut playback when untriggered) — so when the loop region deactivates, playback stops immediately.
Sound Instrument Settings: Async, Loop While Playing, and Cut
Async⌗
Controls whether a sound keeps playing after the playhead leaves its region.
- ON – plays to completion; good for one-shots like explosions.
- OFF – stops when the region ends; use for loops tied to the source (e.g., footsteps, engines).
Loop While Playing⌗
Makes the instrument repeat while it remains triggered.
- Combine with Async ON to loop freely until untriggered.
- Combine with Async OFF to loop only within the region.
Cut⌗
Determines what happens when an async loop is untriggered.
- ON – stops immediately; use for UI or speech.
- OFF – plays out or fades naturally; use for ambiences.
Note: In current FMOD versions, Cut mainly affects async looping instruments. For overlap control, use Polyphony = 1 or Steal Oldest instead.
| Example | Async | Loop | Cut | Notes |
|---|---|---|---|---|
| Explosion | ON | OFF | OFF | Rings out naturally |
| Footsteps | OFF | ON | ON | Stops instantly |
| Ambience | OFF | ON | OFF | Continuous loop |
| UI click | ON | OFF | ON | Prevents overlap |
3. Add and Automate the Distance Parameter⌗
The Distance parameter is one of FMOD’s built-in parameters. There are six built-in parameters: Distance, Direction, Speed, Orientation, Elevation, and Cone Angle.
Built-in parameters automatically update based on the listener’s position relative to the sound source in 3D space.
See more information here: FMOD Built-In Parameters
To add and automate Distance:
- Click the “+” icon → choose Add Parameter Sheet → New Parameter.
- Name it Distance and choose the Built-In type for Distance.
- On your track, insert a 3-Band EQ effect (right-click near the track fader → Add Effect → EQ → 3 Band EQ).
- Right-click the Low Gain knob on the EQ and choose Add Automation. Then click Add Curve and select Distance.
- You have now connected your Distance parameter to the low-frequency gain control on the EQ.
- You’ll see a red automation curve appear under the track.
- Draw the curve so that as Distance increases, the low end fades out.
This simulates real-world behavior—low frequencies carry farther, so as the player gets closer, you regain that low-end presence.
4. Create the Custom Trigger Parameter⌗
Now we’ll add the parameter Unity will control.
- In the Parameters tab, click “+” → Add New Parameter.
- Choose Discrete type (whole-number values).
- Name it Trigger.
- Discrete values are ideal for toggling between on/off or state-based conditions.
- Set its range:
- Min: 0
- Max: 1
- In your event:
- Place the second sound (Teleporter Walk Through 01) under the same track or on a new one.
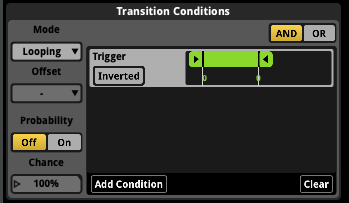
- Go to the Loop region and open its Trigger Conditions panel.
- Set it to play when Trigger = 1.
- For the looping hum track:
- Open its Condition Sheet and add a condition to disable playback when Trigger = 1.
- Add a short fade-out automation for smooth transition.
When Trigger switches from 0 to 1, the looping hum fades, and the teleport sound plays once.
5. Fine-Tune Spatialization⌗
- On the Master Track, open the Spatializer effect.
- Adjust Min Distance and Max Distance values so the attenuation curve fits your in-game scale (e.g., smaller values for tight interior scenes, larger for outdoor).
- Preview using the 3D Preview window in FMOD to confirm how the sound falls off with distance.
6. Save and Build⌗
Finally:
- Save the project.
- Assign your event to the Master Bank.
- Build your banks (
File → Build → Build Banks).
You’re now ready to load this event in Unity.
7. Test in FMOD Before Unity⌗
Play your event in FMOD:
- Drag the Distance slider to watch the EQ automation respond.
- Set Trigger = 1 to hear the teleport sound override the loop.
You should observe:
- The low-end fading out naturally as Distance increases.
- The teleport sound firing instantly when Trigger hits 1.
- The loop stopping cleanly when the parameter condition disables it.
This confirms everything is wired properly before moving to C# integration.
Unity Scene Setup⌗
- Find the teleporter in the scene. Its the
TransitionStartgame object. - Make sure the teleporter has a Box Collider (or whatever shape), set to Is Trigger.
- Place your player (e.g. “Ellen”) in the scene. This will make our sounds easier to test.
- Find Ellen and change her transform position to
X: -145, Y: 21.3, Z: 43. - Alternatively, copy the position of the
TransitionStartobject then paste it into Ellen’s transform, then adjust the X position by -5 to start just outside the trigger.
- Find Ellen and change her transform position to
- Disable or remove other objects so they won’t interfere during testing by unchecking their active state in the Inspector.
C# Script: F_Teleporter.cs⌗
Create a script under your Scripts/FMDO Scripts folder named F_Teleporter.cs and attach it to your teleporter object (the same object holding the trigger collider).
Here’s the full script:
using UnityEngine;

public class F_Teleporter : MonoBehaviour
{

    FMOD.Studio.EventInstance tHum;
    void Start()
    {
        tHum = FMODUnity.RuntimeManager.CreateInstance("event:/SFX/Interactable/Teleporter");
        FMODUnity.RuntimeManager.AttachInstanceToGameObject(tHum, gameObject, GetComponent<Rigidbody>());
        tHum.start();
    }

    // Update is called once per frame
    void OnTriggerEnter(Collider other)
    {
        // Could also use other.CompareTag("Player") for more robust checking if the Player game object had the tag "player"
        if (other.name == "Ellen")
        {
            tHum.setParameterByName("Trigger", 1, false);
        }
    }

    void OnDestroy()
    {
        tHum.stop(FMOD.Studio.STOP_MODE.IMMEDIATE);
        tHum.release();
    }
}
Key Points⌗
CreateInstance(path)must match exactly the FMOD event path.AttachInstanceToGameObject(...)aligns spatial 3D behavior (so position/distance is tracked).setParameterByName("Trigger", 1f, false)changes yourTriggerparameter.- The
falseflag means you don’t bypass seek speed — FMOD seeks based on your parameter settings.
- The
release()frees memory and ensures no audio leaks after object destruction.
Testing & Debugging⌗
- Hit Play in Unity.
- Move the listener close to the teleporter — you should hear the ambient loop with full low frequencies.
- As you back away, low frequencies fade (due to the Distance → EQ automation).
- Walk into the trigger: the teleport sound plays, and the loop stops or fades.
If things don’t work:
- Confirm the collider is set to Is Trigger.
- Double-check your player object’s name (or change the script to use a tag).
- Ensure the FMOD event path is correct and that the event’s bank is loaded.
- In FMOD Studio, verify your parameter mapping and that
Trigger = 1is correctly wired.