Reference Video
For a visual and detailed guide, refer to the video: Recording and Processing Voiceover or Narration in REAPER.
Preparation
- Download Material: Ensure you have downloaded this VO recording to follow along with the editing process in class.
- Set Project Parameters: Confirm that your project is set to 48kHz, 24-bit to avoid mismatches later.
- Save a New Project: Create and save a new project before beginning edits to keep your work organized.
Noise Removal with ReaFir
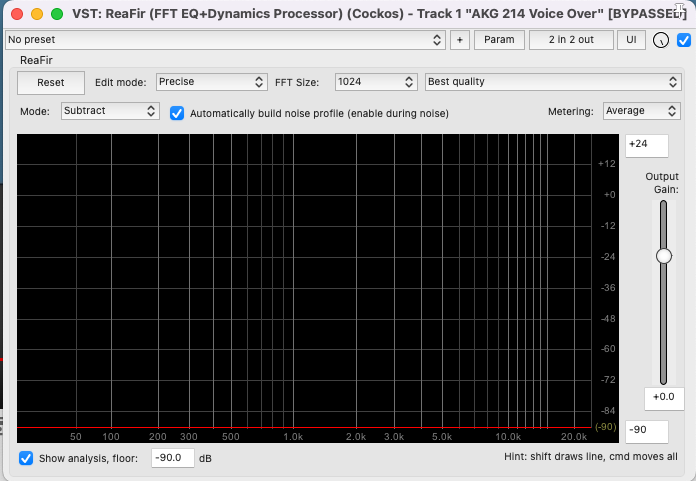
- Add ReaFir Plugin: In Reaper, add the ReaFir plugin to your track.
- Configure Plugin: Refer to the provided settings image, and set up your ReaFir plugin accordingly.
- Build Noise Profile:
- Select a part of the recording where only background noise is present (no vocals).
- Play this part to allow ReaFir to analyze and build a noise profile.
- Once the profile is built, uncheck the option “Automatically build noise profile.”
- Apply Noise Reduction: ReaFir will now use the built profile to remove the background noise throughout your recording.
- Review: A/B compare by toggling the plugin on/off to ensure you’ve reduced noise without introducing metallic or watery artifacts.
Editing
- Split Tracks: Divide your track into separate media items, each representing a phrase or line of dialogue.
- Add Fades:
- Add a fade-in at the start of each item.
- Add a fade-out at the end of each item.
- Ensure the option “Auto-crossfade media items when editing” is enabled in Reaper.
- Remove Clicky Noises:
- Identify and remove mouth noises made by the VO artist.
- Use the action “Item: Split items at time selection” (Shortcut: Shift + S) for precision.
- Replace the removed segment with room tone (a short duplicated section of natural silence from the VO track) rather than total silence. This keeps the background consistent and avoids creating distracting dead air.
- Ripple Editing (Optional):
- Enable ripple editing if you need to remove a part of an item and adjust the timing.
- Use a razor edit (Option + Right-click drag) to select and remove the undesired part.
- Glue Items: Once satisfied with the edits, glue the items back together to consolidate your changes and simplify the rendering process.
Effects
- EQ: Apply ReaEQ and configure a high pass filter (around 80–100 Hz) to eliminate unnecessary low frequencies from the voice.
- Compression: Add ReaComp, set a ratio of 4:1, and enable auto makeup gain.
- Multiband Compression: Implement ReaXComp to compress each frequency range of the voice separately.
- Set a 4:1 ratio for each band.
- Activate “program dependent release.”
- Use “solo current band” for focused adjustments and set thresholds as needed.
- Limiter: Incorporate ReaLimit and set a brickwall ceiling at -5 dB.
- Metering: Place JS: Loudness Meter Peak/RMS/LUFS (Cockos) on your master track to monitor levels before exporting.
- Standard LUFS targets:
- Podcasts / online spoken word: around -16 LUFS
- Broadcast: around -23 LUFS
- YouTube: around -14 LUFS
- Standard LUFS targets:
Rendering
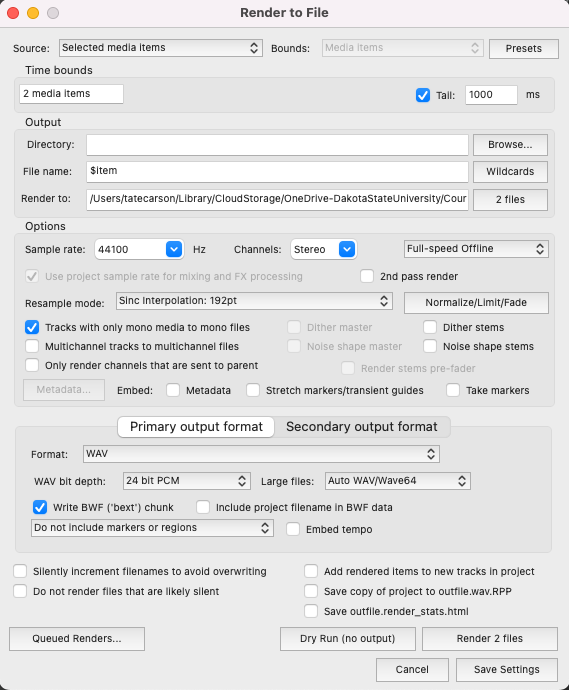
- Review Rendering Settings:
- Note on Mono Files: Pay attention to the option tracks with only mono media to mono files. Use this to render mono tracks as mono files, saving storage space without compromising quality.
- File Naming: Save rendered files with clear names (e.g.,
narration_final.wav,line03_character.wav) for asset management.
Quick Reference Shortcuts
- Split Item: S
- Split at Time Selection: Shift + S
- Razor Edit: Option + Right-click drag
- Glue Items: Cmd/Ctrl + Shift + G
- Toggle Ripple Editing: Alt + P
- Fade Handles: Hover near top corner of item and drag
These step-by-step instructions are designed to guide you through the VO editing process in Reaper efficiently. For additional tips on removing mouth noises, you can watch How To Remove Mouth Noises In Your Recordings.
Extra time? Lets edit one of these VOs as a class Freesound